
I recently worked with a client on an analytics setup and digital audit. During my audit, I noticed that they made a lot of use of underlined text in their content that was not hyperlinked. When I chatted with them about this, they didn’t seem to think it was a problem.
Whenever a conversation drifts into a he-said-she-said scenario, I like to back up my claims with evidence. So in this case, I set up tracking using Google Tag Manager to demonstrate how often visitors are clicking on text that is underlined but does not have a hyperlink.
The added benefit to this is that, once I’ve proved my point, we have an ongoing alert system where we can find existing and future cases where this crops up, should somoene in the team continue old practices. I can set up an audience for this event and use custom insights to get an alert when the clicks happen.
If this sounds like tracking that you’d like for your own site, here’s how I did it, step by step.
One Caveat: This will work only if the underline is actual CSS text-decoration. If the “underline” is fake, i.e. a bottom border or background image effect, then you will need to alter your triggers and variables accordingly.
Step 1: Create Custom Variables And Set Built-In Variables To Track These Clicks
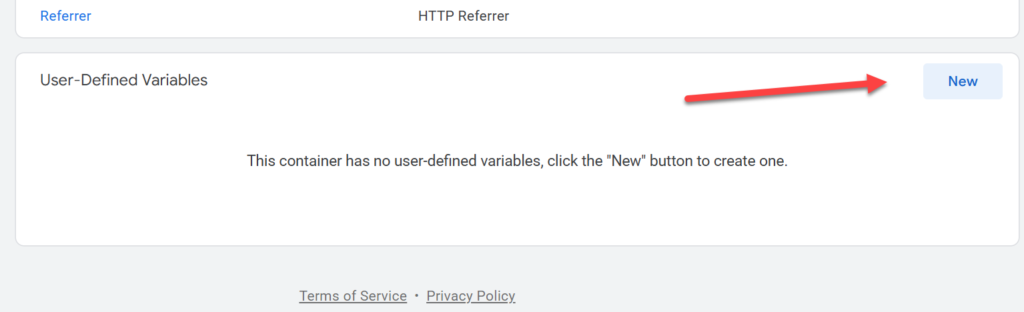
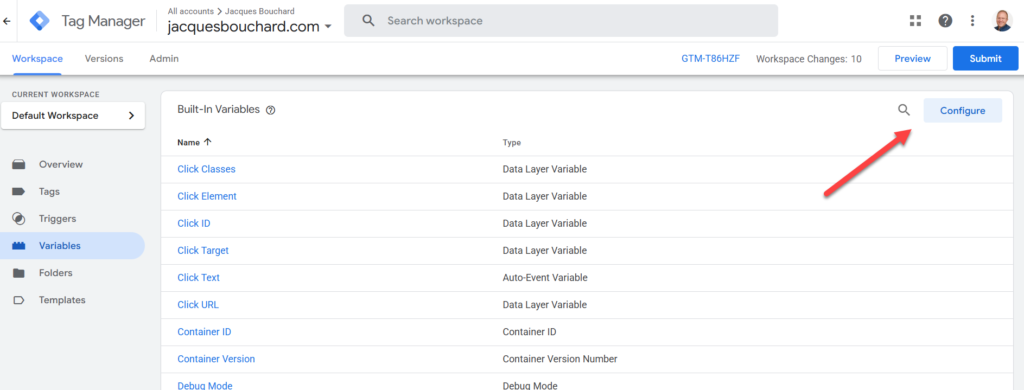
Once you’ve opened your container, click on “Variables” on the left-side menu.

Scroll down on the page and click “New”.
Name your custom variable “JS – Underlined Non-Link Click”, then click on the lego icon in the middle of the box.
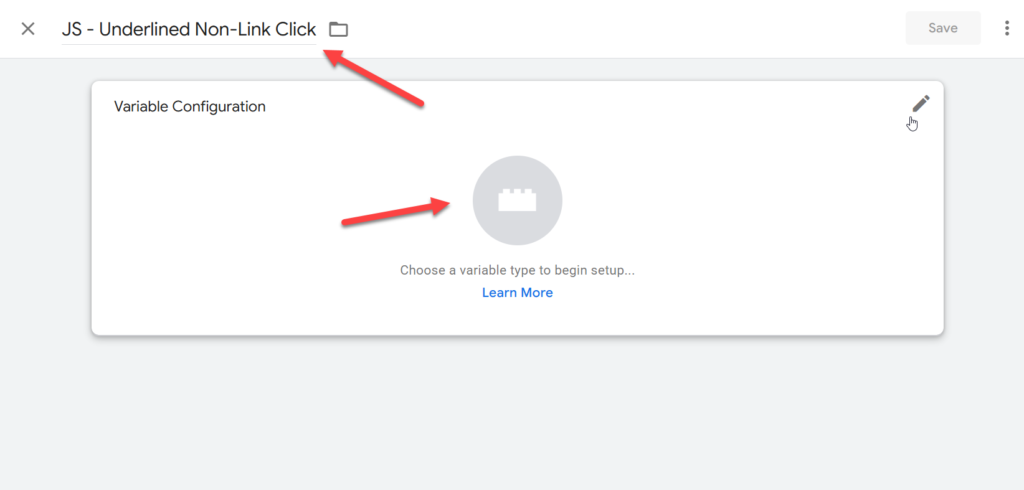
Select “Custom Javascript” from the variable selection menu that appears.

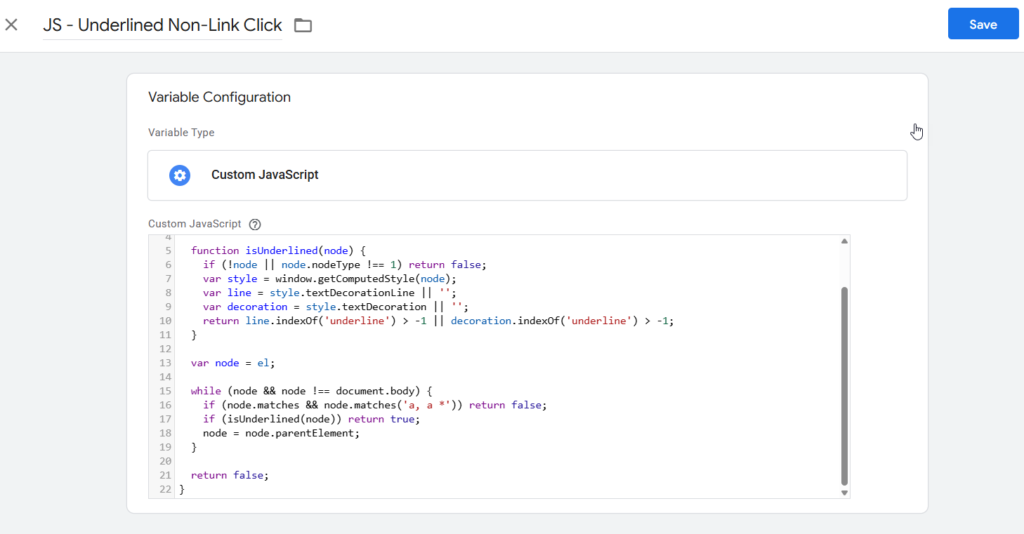
Copy and paste the script below into the box that appears.
function() {

var el = {{Click Element}};

if (!el) return false;

function isUnderlined(node) {

if (!node || node.nodeType !== 1) return false;

var style = window.getComputedStyle(node);

var line = style.textDecorationLine || '';

var decoration = style.textDecoration || '';

return line.indexOf('underline') > -1 || decoration.indexOf('underline') > -1;

}

var node = el;

while (node && node !== document.body) {

if (node.matches && node.matches('a, a *')) return false;

if (isUnderlined(node)) return true;

node = node.parentElement;

}

return false;

}
Your screen should look something like this:
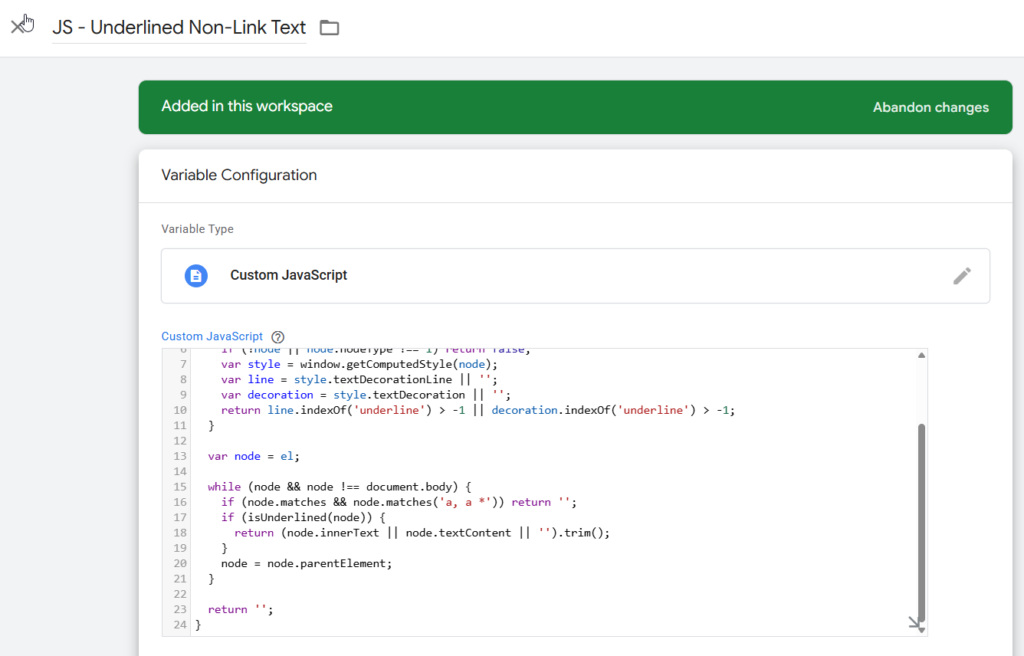
Click Save. Then create a second custom JavaScript variable and name it “JS – Underlined Non-Link Text”. This variable is going to identify what the underlined text is, so you can more easily find it on the page. Copy the text below into the box that appears:
function() {

var el = {{Click Element}};

if (!el) return '';

function isUnderlined(node) {

if (!node || node.nodeType !== 1) return false;

var style = window.getComputedStyle(node);

var line = style.textDecorationLine || '';

var decoration = style.textDecoration || '';

return line.indexOf('underline') > -1 || decoration.indexOf('underline') > -1;

}

var node = el;

while (node && node !== document.body) {

if (node.matches && node.matches('a, a *')) return '';

if (isUnderlined(node)) {

return (node.innerText || node.textContent || '').trim();

}

node = node.parentElement;

}

return '';

}
You should see this:
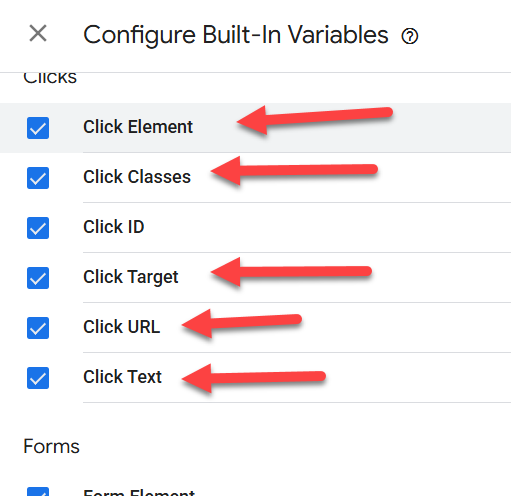
Click Save. Now, scroll to the top of the page and click on “Configure”.
Ensure the following custom variables are turned on (with a blue checkmark on the box to their left):
- Page URL
- Click Element
- Click Classes
- Click Target
- Click Text

Click outside the box to get back to the previous screen. Then, refresh your page. Refreshing your page allows you select these custom data variables in the next step. Otherwise, GTM doesn’t realize they’re there.
Step 2: Create Your Trigger
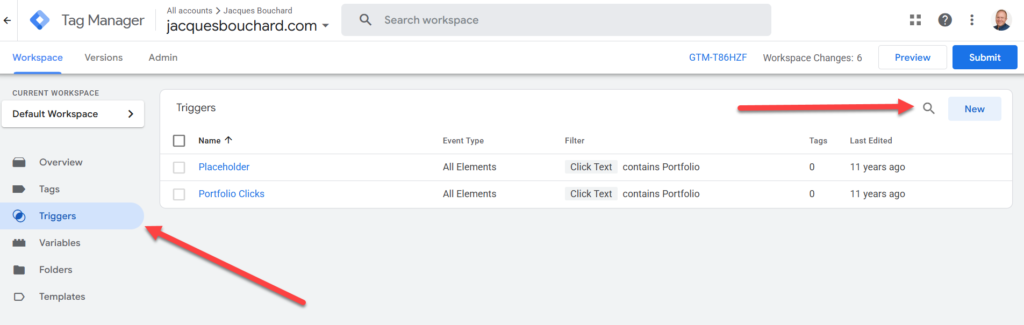
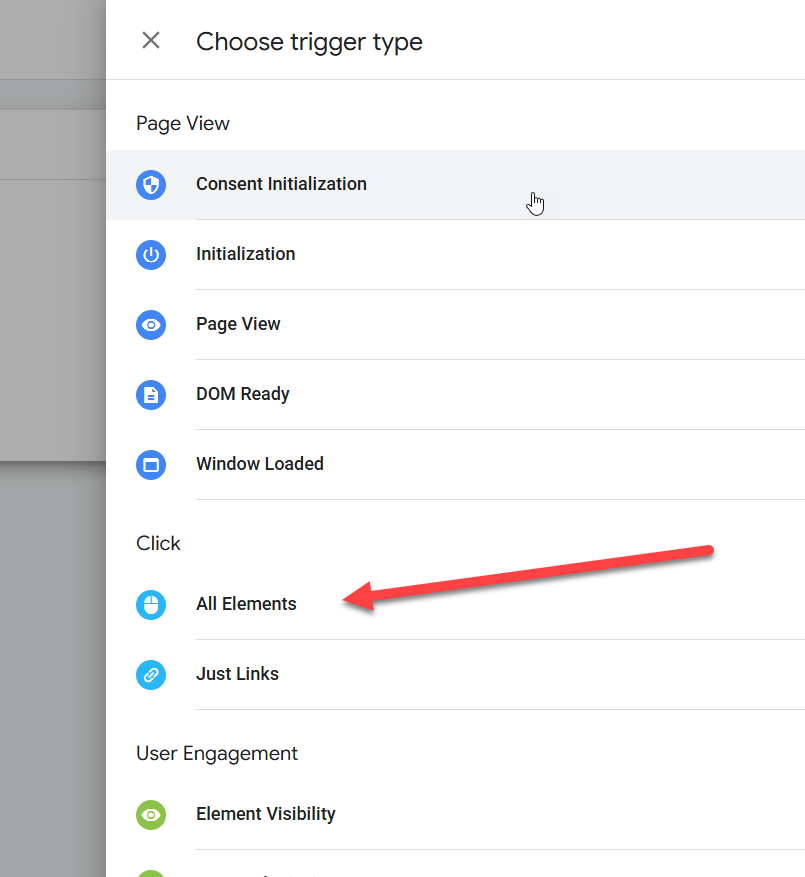
Click on “Triggers” on the left-hand side menu, and then click “New” on the top-right-hand corner, as shown below.
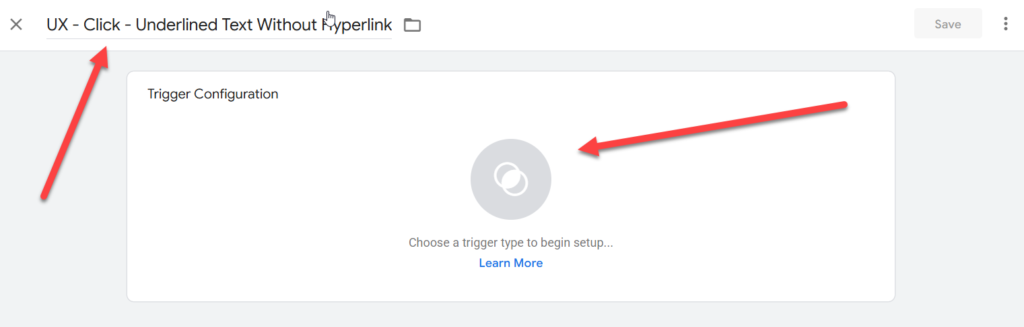
Name your trigger “UX – Click – Underlined Text Without Hyperlink”, and click on the Venn diagram icon in the middle of the screen, as shown below.
Under “Click”, choose the trigger type “All Elements”. (Because this text isn’t a real link with an <a> tag, we use “All Elements” instead of “Just Links”.)
On the next screen, switch the radio button from “All Clicks” to “Some Clicks” and click on “Select Variable”.
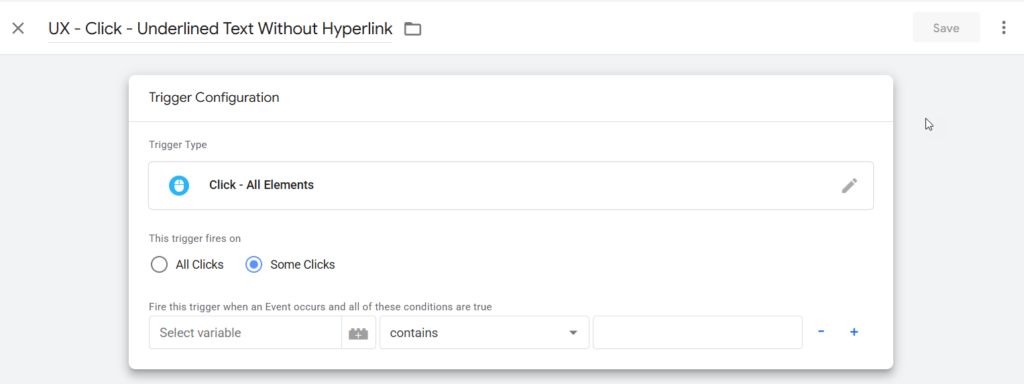
In the dropdown, scroll down and select {{JS – Underlined Non-Link Click}}. Then switch “contains” to “equals” in the next drop-down. In the third box, type “true”. It should look like this:

Click “Save” on the top right.
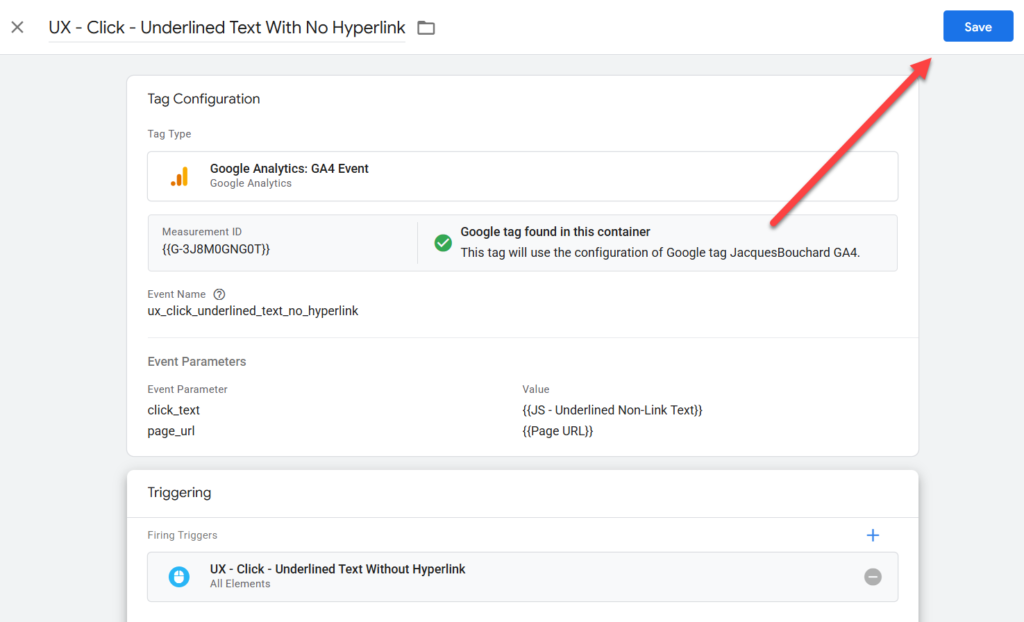
Step 3: Create Your Tag
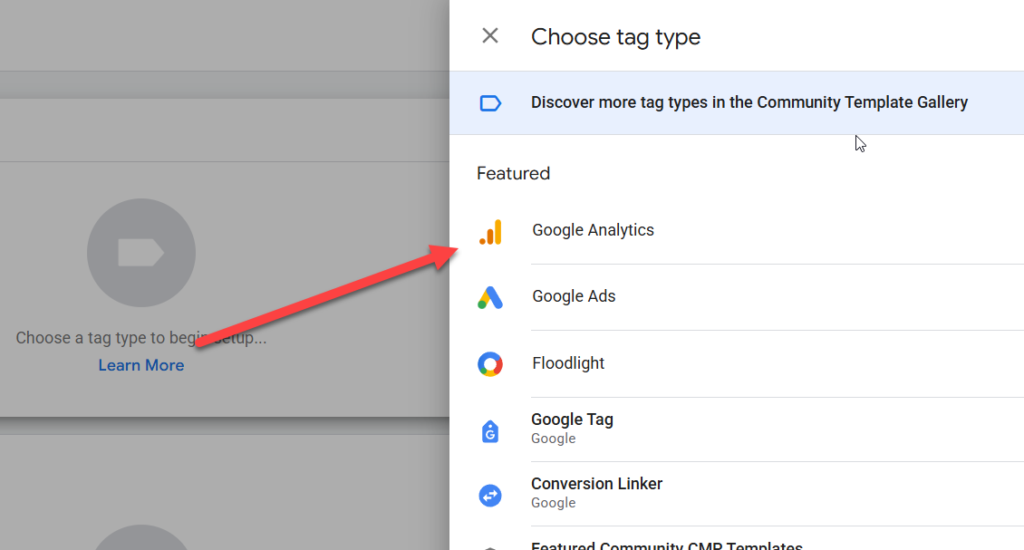
Next, click on “Tags”, and click on “New” in the top right-hand corner.

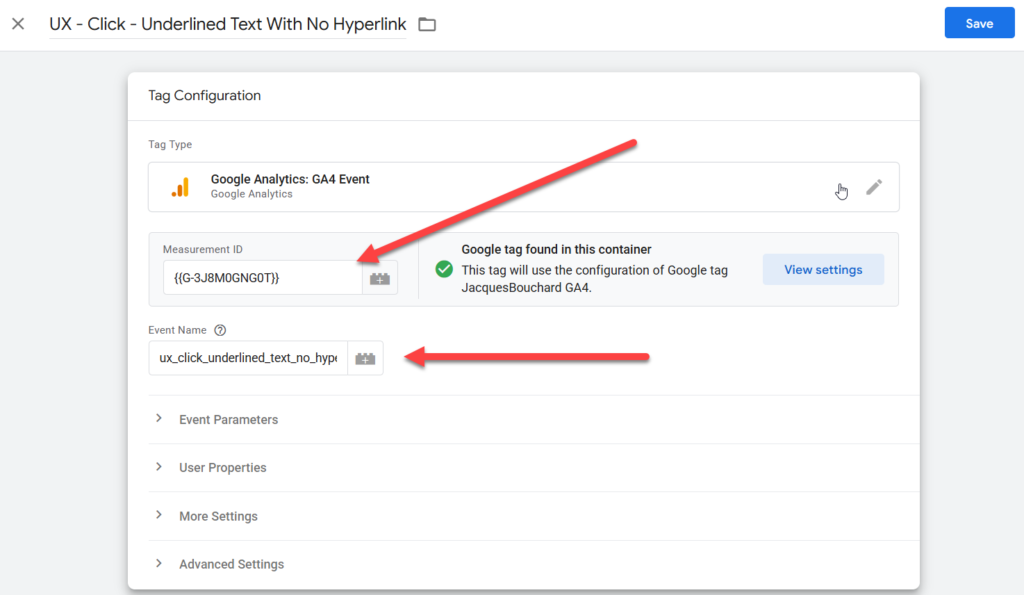
Name your tag “UX – Click – Underlined Text With No Hyperlink”
Click on the icon in the middle of the “Tag Configuration” box, then select “Google Analytics”.
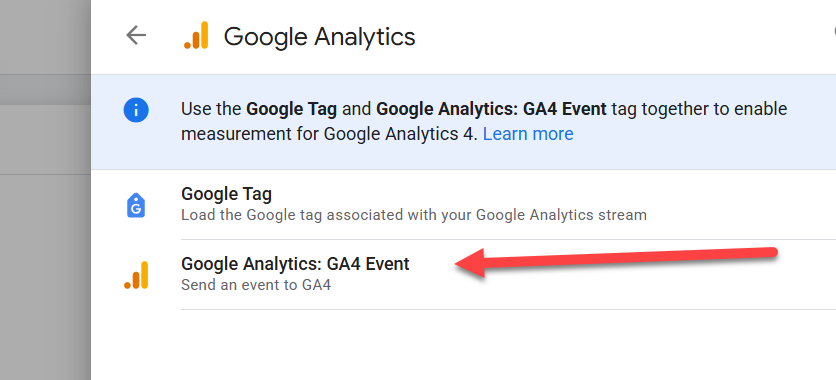
Select “Google Analytics: GA4 Event”.
Type in your GA4 Measurement ID, or select your GA4 Measurement ID variable. Then name your event to appear in GA4. I went with the slightly wordy “ux_click_underlined_text_no_hyperlink”. You should see this right now:
Next, expand “Event Parameters” and click on “Add Parameter” twice.

In the “Event Parameter” fields, type in “click_text” for one, and “page_url” for the other. Be sure to use underscores and not hyphens.
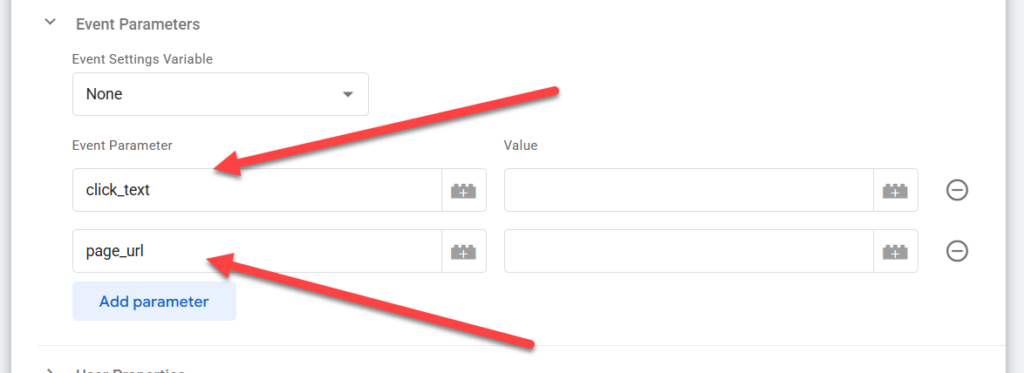
Then, click the lego icons next to the two value fields and select the variable “JS – Underlined Non-Link Text” for the first one, and “Page URL” from the second one. It’ll look like this:

Finally, scroll down to the bottom of the tag, where you see “Triggering”. Click on the Venn Diagram icon in the middle of the box.
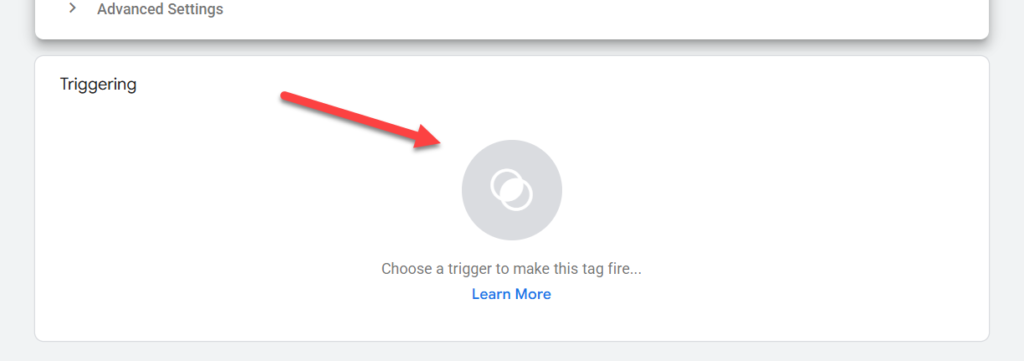
Click on “UX – Click – Underlined Text Without Hyperlink”.

Click on the “Save” botton on the top right-hand side of your screen.
Step 4: Preview, Publish, And Verify Your Event In Real-Time
From here, I recommend you preview the tag to ensure it works.

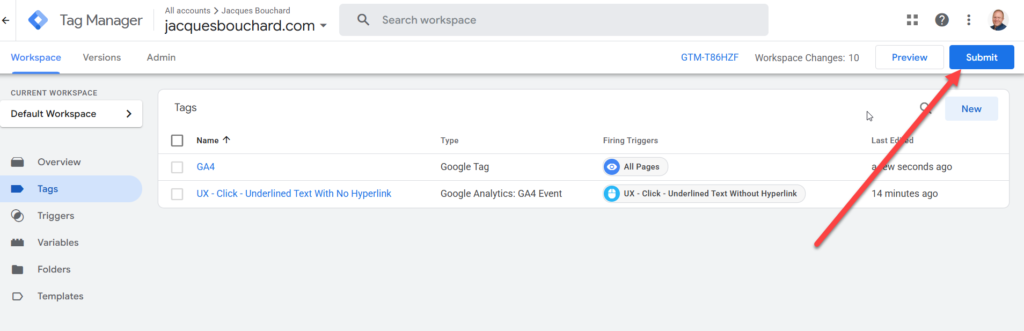
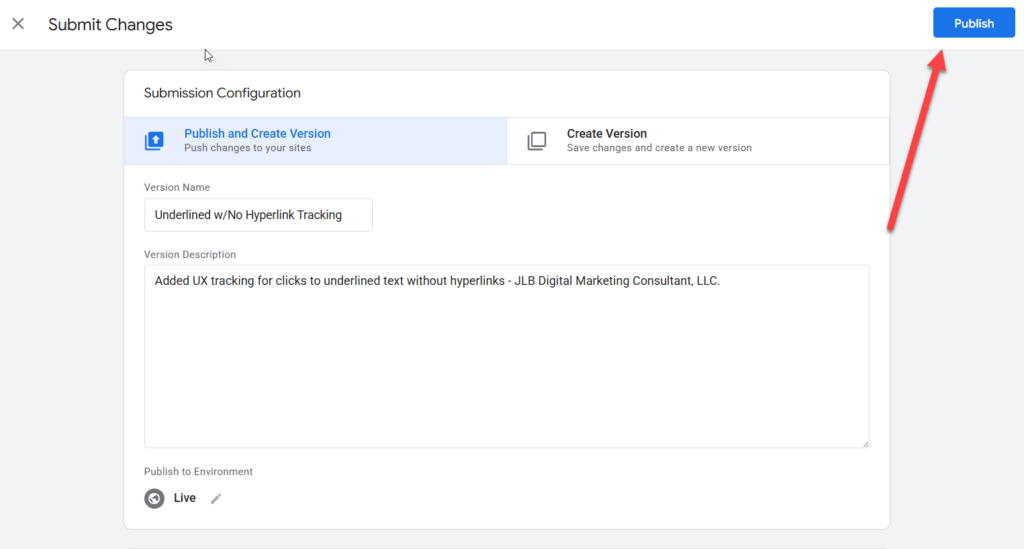
Once you’ve confirmed that, click Submit on the top-right-hand corner, annotate the change, and publish it live. You’re all set!
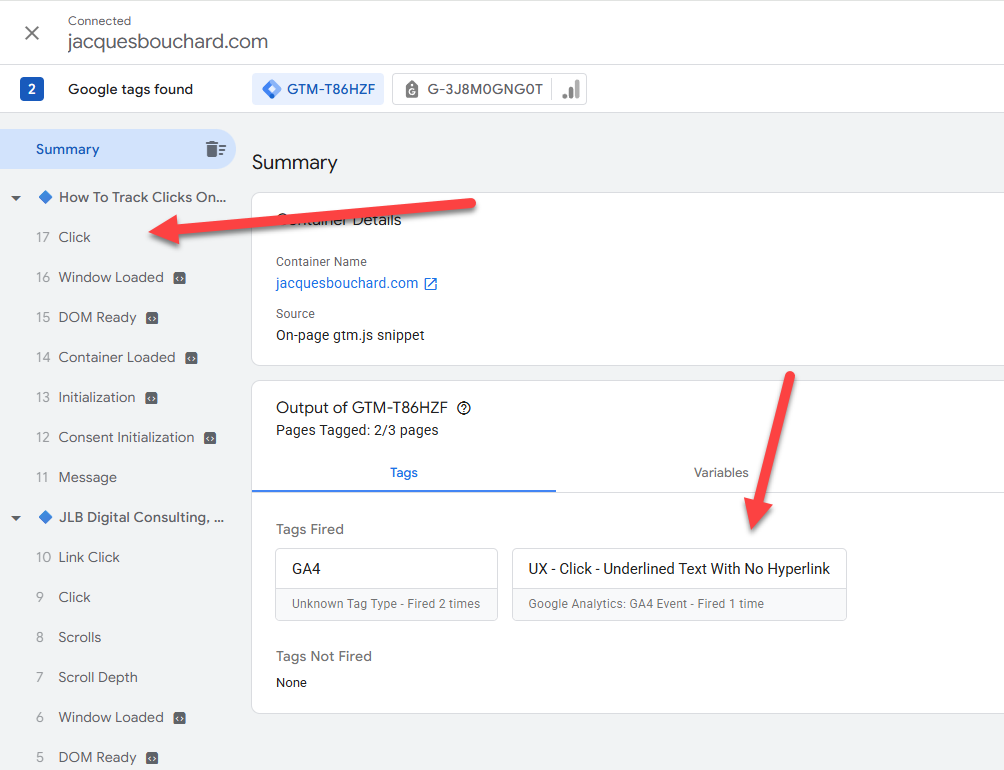
Browse to your website and click on underlined text with no hyperlink to fire the trigger. Check it in GA4 under Reports -> Realtime overview on the right-hand side.
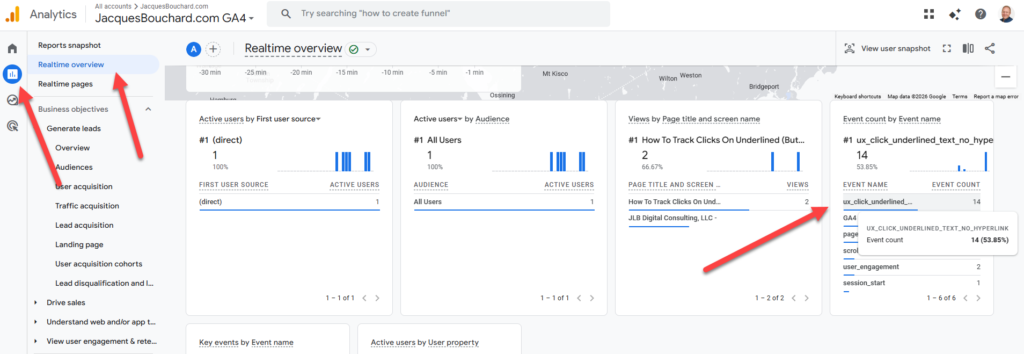
To confirm that it’s tracking the click text correctly, click on the event on the right-hand side.
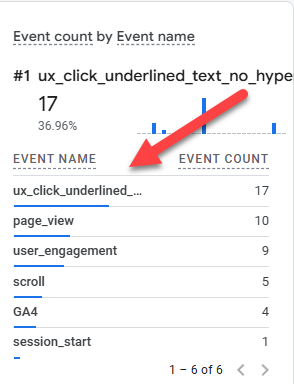
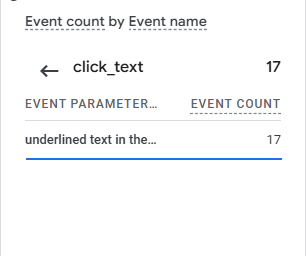
You’ll see the screen below. Click on “click_text”.

You’ll see the click text in the screen that appears.
Step 5: Build Custom Dimensions
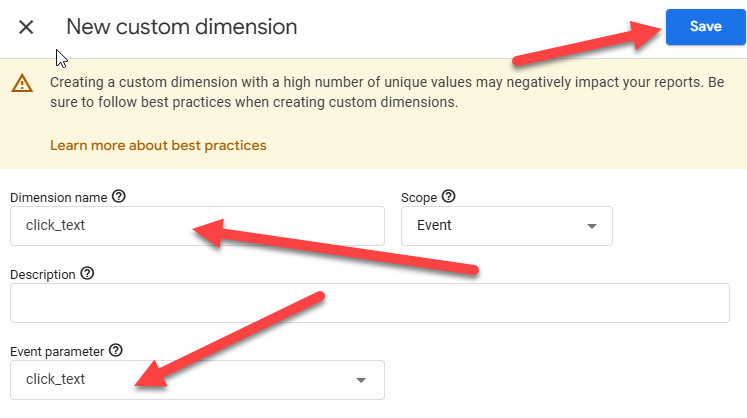
Click on Admin on the bottom-right-hand corner, then click on “Custom Definitions”.

Click on “Create Custom Dimension” on the top-right-hand corner.

For “Dimension name”, enter “click_text”. For “Event Parameter”, enter “click_text”. Click save on the top-right-hand corner.
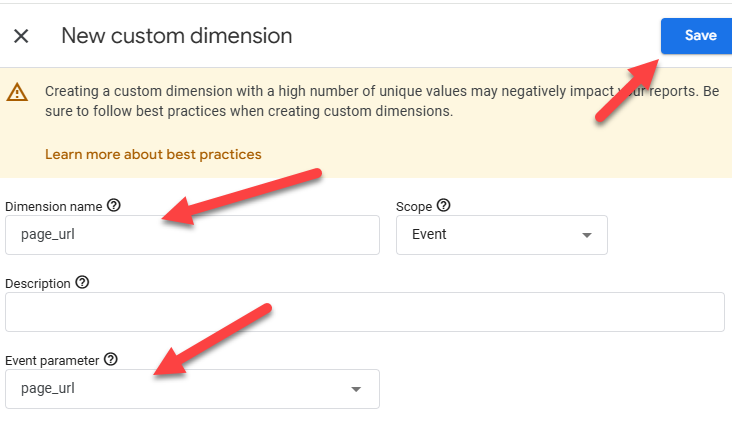
Do the same thing for “page_url”.
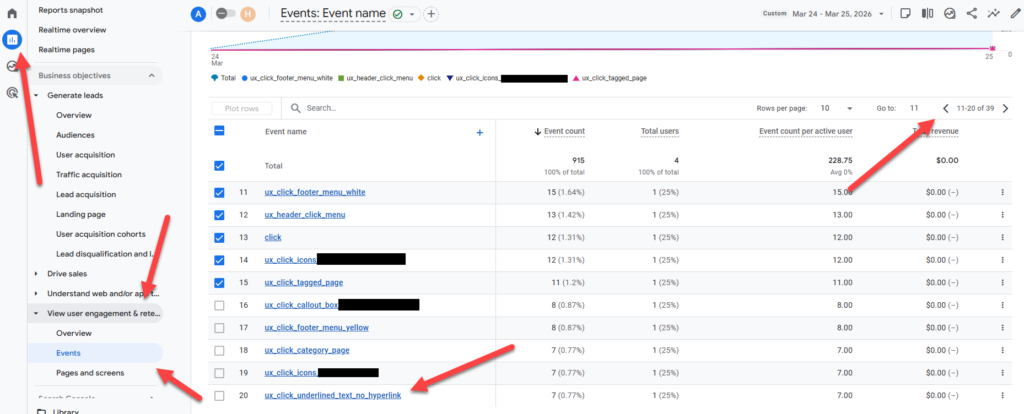
Step 6: View Your Event Data
To view this in GA4 outside of real-time reporting, click on Reports -> View user engagement & retention -> events.
Then click on “ux_click_underlined_text_no_hyperlink” in the events that appear on the right. To find this specific event, you may need to go right a few screens using the < 1-10 of 39 > navigation on the top right.
Scroll down on the page that loads to see your event parameters on the bottom.
You’re all set! If you have any questions, feel free to leave them in the comments below, or email me at jacqueslacombebouchard@gmail.com.
Leave a Reply